CryptoURANUS Economics

Anti-AdBlocker

Tuesday, July 23, 2019

Offload CPU-2-FPGA DataCenters: Cryptocurrency


Offload CPU-2-FPGA DataCenters

FPGA-Based Host CPU Offload with Industry-Standard Data Center Server

By Ameet Dhillon, Director of Business Development, Accolade Technology


BTC


We are all familiar with the term “industry-standard” or “commercial off-the-shelf (COTS)” servers. The generally accepted understanding is these are servers which contain readily available components such as an x86 CPU, memory, storage, networking and a ubiquitous operating system such as Linux or Windows.

We usually think of companies like Dell or HP as suppliers of these industry-standard servers, and over time have come to accept that the best platform for our datacenter applications is an industry-standard server. This is certainly true for a large percentage of applications, but we shouldn’t automatically assume there are no other options.

A slight twist to the industry-standard server, which still includes all the standard components, would be the addition of an onboard FPGA. I don’t mean an FPGA as a “bolt-on” in the form of a PCIe adapter/NIC (though that is a valid solution as well), but rather an FPGA that is mounted onto the motherboard and wired up to interact with the various components around it. Just like all the other components, the FPGA performs a specific and vital function; namely host CPU offload.
An FPGA is a programmable device well-suited to performing application specific functions or algorithms. These functions run the gamut from something very specific such as a proprietary security algorithm to more generic requirements such as time stamping, packet filtering or data deduplication.

A repetitive and CPU intensive task is the ideal candidate for offload to an FPGA. It is not uncommon to reduce CPU load by over 50 percent with the help of an FPGA. In addition, FPGA offload enables remarkable scaling of data center applications previously restricted by CPU bottlenecks.

While the benefits of an onboard or “native” FPGA can be very compelling, there are at least two potential downsides to keep in mind. The first is simply cost. Integrating an FPGA can add a relatively significant cost to the server.

However, the return on investment (ROI) is usually quite apparent if your data center application performs repetitive tasks which can be offloaded. Since FPGA offload dramatically reduces the burden on your host CPUs, thereby optimizing application performance, these added benefits are often well worth the cost.
The second downside is FPGA programming complexity. In the FPGA world, you don’t call someone a programmer but rather a “designer” or “design engineer.” This is because FPGAs are not programmed in common languages such as C or Java.

Rather, FPGAs are designed using Verilog or VHDL which are hardware description languages (HDLs) used to model electronic systems. For this reason, it is often not possible for a software application development team to program an FPGA with the specific offload function or algorithm they need to achieve the desired level of CPU offload.

 The solution to this dilemma is to partner with a vendor that has expertise in FPGA design and can provide comprehensive offload functions as well as custom features tailored for each specific customer scenario.
Accolade Technology is a vendor that fits such a profile with its ATLAS-1000 FPGA integrated platform.  

Figure 1 shows the 1U, half-width, ATLAS-1000 incorporating a Xilinx FPGA natively on the motherboard.

Like industry-standard servers, the ATLAS-1000 provides a multi-core Intel CPU, memory and storage along with an FPGA loaded with packet processing capabilities such as lossless packet capture, packet filtering, nanosecond precision timestamping, deduplication, flow classification and multi-core DMA.


In addition to the onboard FPGA, the platform has several other unique attributes such as direct GPS decode on the motherboard, pluggable interface modules that support 10 or 40G and a small footprint that accommodates two ATLAS-1000 units mounted side-by-side in a standard 19-inch rack.

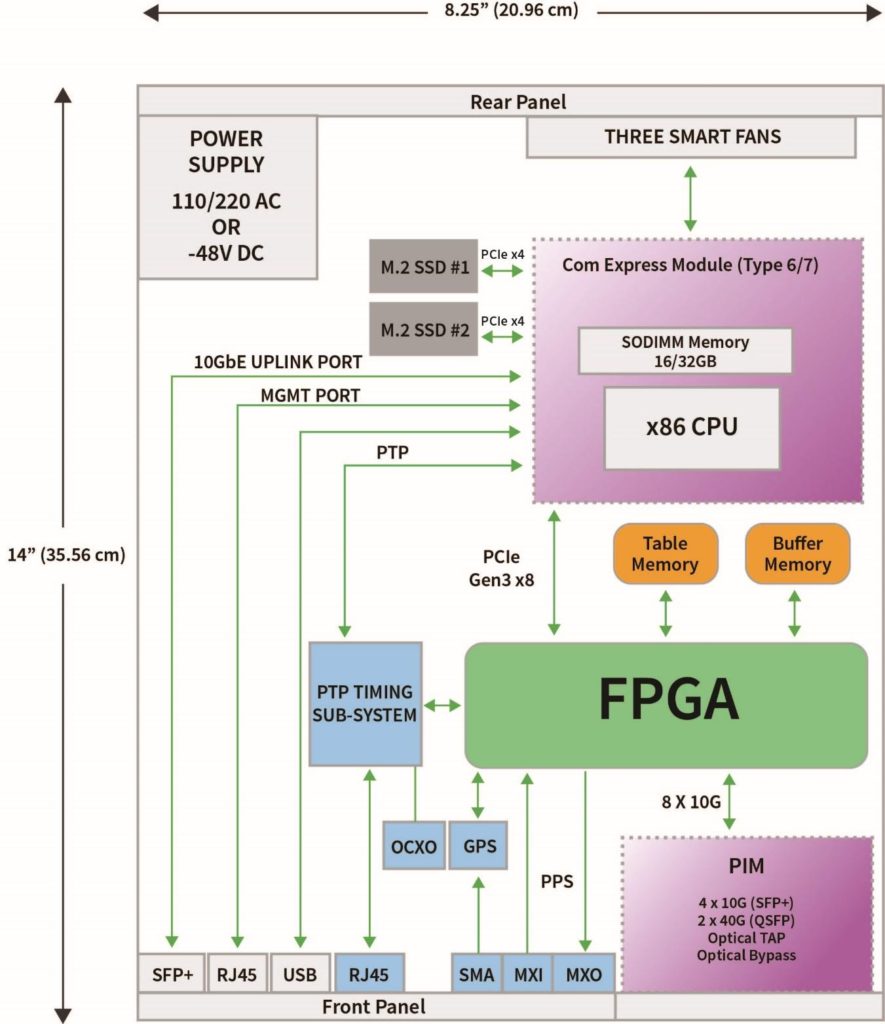
Figure 2 shows a comprehensive architectural layout of this hardened platform. The platform is ideal for network/cyber security or monitoring applications such as DPI, NetFlow exporting, data deduplication or cluster load balancing.

For Website Source of details visit this link.

ChangeOfHands: Cryptocurrency

What is cryptocurrency definition of "Change Hands"? 


What is cryptocurrency definition of "Change Hands"? This is similar to the dead-president green-back USD definition of "cash change of hands".

Example: Miss Penelope gives cash to Mr. PeeWee, and then he becomes the new owner of these dead-presidents.

In  same example of transacting online. A third party or payment service validates transaction(s) and ensures that your Mom's money makes it to Long-John-Silvers account.

When it comes to transacting in cryptocurrency? How does digital money change hands?

About trust to transact:

Transactions require blind trust, because economic value is at stake. If transacting parties are strangers, they may ask a trusted third party to oversee transactions to its end completion.

Cryptocurrencies are mostly or attempt to be decentralised.

This means that digital parties transact/interact directly without oversight of  third party ensuring integrity of transaction(s).

Blockchain technology always crosses line into third party void, whereby to verifying and recording transactions translates into true and authentic completion.

The use of 'public key cryptography' ensures digital transaction(s) information sent remains confidential.

Public key cryptography provides the transaction authorization and privacy.

Third party transaction(s) interacting in cryptocurrency exchange offer higher security by this blockchain technology and public key cryptography making privacy and secure transactions a better relativity than reserve banking.


How cryptocurrency changes hands
  1. Let's say Miss Motley wants to send Long-John five bitcoin. Her transaction is sent to a server nodes (computer servers) in the Bitcoin blockchain network.
  2. These nodes check transaction(s) are valid based on the transaction  network cryptographic and interaction rules. By checking Miss Motley's public key decrypts targeted digital signature attached to her transaction that she originally authorised bitcoin(s) transferred.
  3. Mss Motley and Long-John's transaction have not yet been entered in the blockchain (distributed online ledger). This transaction added to the pool of unconfirmed transactions.
  4. Unconfirmed nodes in network group batch transactions into 'block's is process by definition termed of 'mining'. The blockchain mining is between computers. This requires nodes to find a certain number  combined content of a block of transactions and crunched/hash through a specific algorithm. This results in another number (hash) of predefined qualities.
A Bitcoin network hashes for 10 minutes to guess a correct number.

This is the rational term of; 'mining'.

The efforts in maintaining a server blockchain associated with the costs associated server-computers in successful mining have it's economic rewarded.


  1. Once a hash transaction block has been completed, the successful miner broadcasts their result to the rest of the blockchain network. The network checks that the newly created block is correct and starts the processing a new block all over again.
  2. The transaction is now confirmed, Miss Motley and Mr. Long-John will now wait until further blocks hashes added to the chain before acting on their transaction.
Transaction block(s) contain(s) the hash calculation for the previous block, anchoring them in a chain fashion.

Hash acts as reference specific to transactions block(s).

If one block changes, all of the hashes from that block forward must also change so that the blocks remain linked.

Good luck in all your Bitcoin Alt-Coin adventures and until next time good luck.


Monday, July 22, 2019

Xilinx JTAG-XC3SPROG-LibUSB Linux: Cryptocurrency


Xilinx JTAG-XC3SPROG-LibUSB Linux

OLD: Xilinx JTAG Linux

My poor Server can’t cope!
If you make copies of this page or rehost it, please host your own images. My poor Server can’t cope!
FiXED!!! 

Introduction


This is Xilinx JTAG-XC3SPROG-LibUSB Linux as a basic howto on installing the cable drivers for the Xilinx ISE (specifically iMPACT) under Linux/Unix.

This page was modified to include the ISE installation.

This method I have tested on Ubuntu 8.04, 10.04_beta and Mint Gloria.

It should certainly be valid for any Debian based system, and probably any system where it is possible to do what I have suggested.


A Short Guide to Installing Xilinx ISE

This Install Guide refers to Ubuntu 9.10 (Karmic Koala) 64-bit Desktop Edition.

Installing Xilinx ISE, and the installer needs to have write permissions to the setup files. Burning the files to DVD has been reported to create problems.

Download Xilinx ISE from Xilinx website.

This guide assumes you have Xilinx_11-14_ISE_DS_SFD, which is the full version, and not the webpack.

To do this, change into the folder with the installer files are located and issue the command
sudo chmod a+x xsetup
Then you are ready to install the ISE suite. I suggest you do this as root. To start the installer, enter the following command:
sudo ./xsetup
Go though the menus, as they are fairly obvious. Here are my suggested responses:
    • Next the welcome screen.
    • Accept the License Agreement.
    • Accept the License Agreement, once again.
    • Except the default install path of /opt/Xilinx/11.1 – Feel free to change this, but the rest of this guide assumes you have left this.
: Also note, when working and referring to this path, that Xilinx begins with a capitalised X. This tricked me for some time
  • Select what you wish to be installed. I chose ISE Design Suite Product including the Design Tools, PlanAhead, DSP Tools, Embedded Dev Kit, ChipScope Pro. Next when you are ready.
  • Select the ISE Design Tools. I left everything checked: Design Enviroment Tools, WebPack Devices, Foundation/Edition Devices.
  • Keep all the suggested paths.
  • You next have to select the last few installation options. Check Aquire/Manage a License Key. Uncheck Install cable drivers (does not work, use the method outlined below) and Launch XilinxUpdate – This is a minor detail, and can be done later.
  • Review the options summary. Here is mine. Yours will look different based on Distro, and your options.
Install Location : /opt/Xilinx/11.1
Acquire or Manage a License Key
Launch XilinxUpdate
ISE Design Tools
Install Location : /opt/Xilinx/11.1/ISE
XILINX = /opt/Xilinx/11.1/ISE
PATH = ${XILINX}/bin/${PLATFORM}
LMC_HOME = ${XILINX}/smartmodel/${PLATFORM}/installed_${PLATFORM}
LD_LIBRARY_PATH = ${XILINX}/lib/${PLATFORM}
Design Environment Tools
WebPack Devices
Foundation/Edition Devices
Enable WebTalk
Set Xilinx Registry
PlanAhead Analysis Tool
Install Location : /opt/Xilinx/11.1/PlanAhead
XILINX_PLANAHEAD = /opt/Xilinx/11.1/PlanAhead
PATH = ${XILINX_PLANAHEAD}/bin
PlanAhead Common Files
Setup Environment
Embedded Development Kit (EDK)
Install Location : /opt/Xilinx/11.1/EDK
XILINX_EDK = /opt/Xilinx/11.1/EDK
LD_LIBRARY_PATH = ${XILINX_EDK}/lib/${PLATFORM}
PATH = ${XILINX_EDK}/bin/${PLATFORM}:${XILINX_EDK}/lib/${PLATFORM}
Platform Studio Tool and Processor IP
ChipScope Pro
Install Location : /opt/Xilinx/11.1/ChipScope
CHIPSCOPE = /opt/Xilinx/11.1/ChipScope
PATH = ${CHIPSCOPE}/bin/${PLATFORM}
LD_LIBRARY_PATH = ${CHIPSCOPE}/lib/${PLATFORM}:${CHIPSCOPE}/xilinx/lib/${PLATFORM}
ChipScope Pro Common Files and Serial I/O Toolkit option support
DSP Tools (System Generator, AccelDSP)
Install Location : /opt/Xilinx/11.1/DSP_Tools
XILINX_DSP = /opt/Xilinx/11.1/DSP_Tools/lin64
LD_LIBRARY_PATH = ${XILINX_DSP}/sysgen/lib
PATH = ${XILINX_DSP}/common/bin
TEMP = /tmp
TMP = /tmp
System Generator for DSP
Unix/Linux Post-installation script
    • Wait for a small eternity.
    • The Xilinx License Configuration Manager should appear:
Select what best describes what you need. The “Start ISE WebPack” gives you unlimited access to fundamental applications, but not to everything.

For help, check out the Xilinx Software Matrix, here.

At this point, I select “Get my Purchased Licenses”. This opens Firefox (or your default web browser), and asks you to log into their system. You can download your licenses file from them, and browse to it using the “Copy License” button under the “Manage Xilinx License” tab. Either way, get a license from Xilinx. Once you have done so, close the License Config Manager.
  • You should be told Installation is complete;  Press Okay.
  • Move onto the next steps of installing cable drivers.

Using Xilinx USB JTAG Programmers under Linux (Installing Cable Drivers)

Assuming you have followed the above installation howto, this next section should follow on.

If you jumped straight here to this section the next section on installing Cable Drivers should standalone. If you have problems, please check that you have similar options set in your ISE install to those I outline in the previous section.

Getting what’s needed

First of all, this guide assumes you have installed Xilinx ISE (version 11.1 is used here) into the default path of /opt/Xilinx
Next, you will need to have GIT installed to get the required libraries. This approach does not use the official Xilinx libraries but a replica of them. You will also need libusb-dev which is required in the compiling of the drivers. You will also need build-essential metapackage for the compiler. On a 64-bit host, you will need to get the 32-bit version of libc6-dev-i386.
On 32-bit
sudo apt-get install gitk git-gui libusb-dev build-essential libc6-dev fxload
On 64-bit
sudo apt-get install gitk git-gui libusb-dev build-essential libc6-dev-i386 fxload
Philipp HÃrauf reports there is a need to install ia32-libs-dev on some 64-bit systems, though I didn’t require this.

Download the driver source

You should firstly change to the installation directory. You need (assuming default install path) to change directory to /opt/Xilinx. Then you will be required to use git to download the source.
cd /opt/Xilinx
sudo git clone git://git.zerfleddert.de/usb-driver

Compiling the Driver

This step is once simple command, but the most important. Firstly change into the source directory created in the previous step. Then you need to issue the make command.
cd usb-driver/
On 32-bit
sudo make
On 64-bit
sudo make lib32

Linking in the Compiled Driver

This step is not needed for versions of Xilinx ISE newer than 10.1: LD_PRELOAD instructs the loader to load additional libraries into a program, beyond what was specified when it was compiled. It allows us to load the USB CableDriver into iMPACT without recompiling it (which we clearly cannot do).
export LD_PRELOAD=/opt/Xilinx/usb-driver/libusb-driver.so

Satisfying udev

udev is the device manager for the Linux 2.6 kernel series. Primarily, it manages device nodes and hotpluging, which means that it handles the adding/removing devices, including firmware loading. This is what we are required to do. The Xilinx Programmer doesn’t have any firmware, and so we need to tell the computer that when we plug in the programmer, that it should attempt to load the correct firmware to it. fxload should do this for us. Fortunately all of the complex stuff comes with the driver source downloaded previously. All we need to do is put it in the places the computer expects it. Then we need to restart udev, so it sees the new configurations.
In Ubuntu 9.10/10.04 (or if udev doesn’t appear to notice a plug-in):
sudo sed /opt/Xilinx/11.1/ISE/bin/lin/xusbdfwu.rules -e ‘s:TEMPNODE:tempnode:g’ > /etc/udev/rules.d/xusbdfwu.rules
sudo cp /opt/Xilinx/11.1/ISE/bin/lin/xusb*.hex /usr/share/
sudo /etc/init.d/udev restart
Other
sudo cp /opt/Xilinx/11.1/ISE/bin/lin/xusbdfwu.rules /etc/udev/rules.d/
sudo cp /opt/Xilinx/11.1/ISE/bin/lin/xusb*.hex /usr/share/
sudo /etc/init.d/udev restart

Fixing the Path

This step may not be required if the Xilinx install appends to your .bashrc automatically:
Running the following two lines will add the Xilinx path to the system path, and will ensure that the Xilinx binaries are accessable by the system.
32-bit
echo “PATH=\$PATH:/opt/Xilinx/11.1/ISE/bin/lin” >> ~/.bashrc
echo “export PATH” >> ~/.bashrc
64-bit
echo “PATH=\$PATH:/opt/Xilinx/11.1/ISE/bin/lin64” >> ~/.bashrc
echo “export PATH” >> ~/.bashrc
Some people reported that the 32-bit version didn’t work correctly on 64-bit host.
Ensure you are using the 64-bit version of the ISE software.
The 64-bit stuff is located in /opt/Xilinx/11.1/ISE/bin/lin64/

Running the programs

Before you can call any of the Xilinx ISE Suite, you must close the terminal you have open, and reopen a new one. This causes bash to reload, getting the new path variable. You can now run anything from the Xilinx ISE Suite. If you know the program you wish to run, for example, you can simply call it from a terminal window, like so:
user@box:~$ impact

All Done

Once you get to here, the cable drivers should work. When you plug the programmer in, you will notice that after a short while, the programmer’s status LED turns green. This indicates that the firmware was successfully loaded. If you open Xilinx’s iMPACT with the programmer connected to the computer and a circuit, you should be able to execute a boundary scan. The image below shows Xilinx iMPACT running under Linux Mint 7 (Gloria) with a Boundary Scan of my Spartan-3E board.

Xilinx iMPACT – GUI


 Xilinx iMPACT – Log Window Text

This is the result of a boundary scan on my Spartan-3E board.
Welcome to iMPACT
iMPACT Version: 11.1
// *** BATCH CMD : setMode -bs
GUI — Auto connect to cable…
// *** BATCH CMD : setCable-port auto
AutoDetecting cable. Please wait.
PROGRESS_START – Starting Operation.
OS platform = i686.
Connecting to cable (Usb Port – USB21).
Checking cable driver.
File version of /opt/Xilinx/11.1/ISE/bin/lin/xusbdfwu.hex = 1030.
File version of /usr/share/xusbdfwu.hex = 1030.
Using libusb.
Max current requested during enumeration is 74 mA.
Type = 0x0004.
Cable Type = 3, Revision = 0.
Setting cable speed to 6 MHz.
Cable connection established.
Firmware version = 1028.
File version of /opt/Xilinx/11.1/ISE/data/xusb_xlp.hex = 1303.
Firmware hex file version = 1303.
Downloading /opt/Xilinx/11.1/ISE/data/xusb_xlp.hex.
Downloaded firmware version = 1303.
PLD file version = 0012h.
PLD version = 0012h.
PROGRESS_END – End Operation.
Elapsed time = 1 sec.
Attempting to identify devices in the boundary-scan chain configuration…
INFO:iMPACT – Current time: Thu Oct 8 18:50:31 2009
// *** BATCH CMD : Identify
PROGRESS_START – Starting Operation.
Identifying chain contents…’0′: : Manufacturer’s ID = Xilinx xc2c64a, Version : 0
INFO:iMPACT:1777 –
Reading /opt/Xilinx/11.1/ISE/xbr/data/xc2c64a.bsd…
INFO:iMPACT:501 – ‘1’: Added Device xc2c64a successfully.
———————————————————————-
———————————————————————-
‘1’: : Manufacturer’s ID = Xilinx xcf04s, Version : 15
INFO:iMPACT:1777 –
Reading /opt/Xilinx/11.1/ISE/xcf/data/xcf04s.bsd…
INFO:iMPACT:501 – ‘1’: Added Device xcf04s successfully.
———————————————————————-
———————————————————————-
‘2’: : Manufacturer’s ID = Xilinx xc3s500e, Version : 4
INFO:iMPACT:1777 –
Reading /opt/Xilinx/11.1/ISE/spartan3e/data/xc3s500e.bsd…
INFO:iMPACT:501 – ‘1’: Added Device xc3s500e successfully.
———————————————————————-
———————————————————————-
done.
PROGRESS_END – End Operation.
Elapsed time = 0 sec.
// *** BATCH CMD : identifyMPM

Linux Kernel

Below shows the the linux kernel reporting that it finds the device. Notice that it finds the device 3 times. It finds the chip with no firmware, then once it recognises it, it uploads firmware, and then it restarts. It finds the chip with the firmware, initilises it, and then restarts the chip. You should see this.
kernel: [690505.051492] usb 2-1: new high speed USB device using ehci_hcd and address 45
kernel: [690505.184191] usb 2-1: configuration #1 chosen from 1 choice
kernel: [690505.296118] usb 2-1: USB disconnect, address 45
kernel: [690507.251482] usb 7-1: new full speed USB device using uhci_hcd and address 2
kernel: [690507.393556] usb 7-1: not running at top speed; connect to a high speed hub
kernel: [690507.416882] usb 7-1: configuration #3 chosen from 1 choice
kernel: [690510.041561] usb 7-1: USB disconnect, address 2
kernel: [690511.800521] usb 2-1: new high speed USB device using ehci_hcd and address 47
kernel: [690511.931390] usb 2-1: configuration #2 chosen from 1 choice

The All-Telling Status LED

If you do it all correctly, once the kernel has settled, you should get the status led illuminated. This will either be the LED on the front of the JTAG box, or on the Spartan-3E board, the status LED next to the USB-B socket (shown with the red arrow).


Troubleshooting

Thying to make a perfect guide for many different possible combinations is hard. Here is a section of things to try before you dispondantly email me.

Newer UDEV (Ubuntu 9.10/10.04)

Many people are reporting problems with the new UDEV system, usually the one used in Ubuntu 9.10. This problem is easily overcome by simply editing your udev rules. Using your favorite editor, edit /etc/udev/rules.d/xusbdfwu.rules and change any reference to $TEMPNODE to $tempnode. This is done automatically in the howto above. Remember to restart udev after this:
sudo /etc/init.d/udev restart

Impact 64-bit

If using the 64-bit version of Impact, there are some slight changes. Source 6 describes in more detail how to get the 64-bit version of Impact running, but simply all that needs to be done is:
cd /usr/lib64
sudo ln -s libusb-0.1.so.4 libusb.so
(I have not personally tested this)

Sources

    • [1] Using Xilinx USB cable on LinuxMint / Ubuntu without windvr
::(http://paddydempster.wordpress.com/2008/04/08/using-xilinx-usb-cable-on-ubuntu-without-windvr/)
::Taken on 19/Aug/2009 at 23:21 BST
    • [2] libusb/ppdev-connector for XILINX jtag tools
::(http://git.zerfleddert.de/cgi-bin/gitweb.cgi/usb-driver?a=blob;f=README;h=265dd3941b23edf68c967b3e3a627c1265f1caa3;hb=HEAD)
::Also included in /opt/Xilinx/usb-drivers/README
::Taken on 19/Aug/2009 at 23:28 BST
    • [3] udev ignoring rules? any help appreciated! ubuntu 9.10
::(http://ubuntuforums.org/showthread.php?t=1313572)
::Taken on 09/Nov/2009 at 01:11 GMT
    • [ubuntu How does USB work | Xilinx Spartan 3E driver problem
::(http://ubuntuforums.org/showthread.php?t=1307574&highlight=xilinx+ise+11.1)
::Taken on 09/Nov/2009 at 00:20 GMT
::Thanks to Mehmet Tukel, Teaching Assistant at Istanbul Technical University for this source.
    • [5] Xilinx USB programmer – problems with Debian/Linux – Solved
:: (http://groups.google.com/group/comp.arch.fpga/browse_thread/thread/2492e85c32938119/386d80ad26dbb974?lnk=gst&q=Wojtek#386d80ad26dbb974)
::Taken on 09/Nov/2009 at 00:41 GMT
::Thanks to Werner Hein for this source.
    • [6] ISE 11.2, Impact can’t find USB II cable, SLED 11 Linux 64 bit
::(http://forums.xilinx.com/xlnx/board/message?board.id=INSTALLBD&message.id=467&query.id=386680#M467)
::Taken on 13/Nov/2009 at 11:03 GMT
::Thanks to Jonathan Drolet for this source.

Updates

  • [29/Jul/2011] Added ia32-libs-dev to dependancies on 64-bit systems. (Thanks to Philipp Hörauf).
  • [05/Feb/2010] Adjusted the dependencies, seperating 32/64-bit hosts. (Thanks to Jerry G. for pointing this confusion out).
  • [15/Apr/2010] Added information for Ubuntu 10.04.


NEW: Xilinx JTAG Linux

This page is an updated version of OLD Xilinx JTAG Linux. If you are having problems with older versions of Ubuntu or the Xilinx ISE, then check out the old page.

Xilinx JTAG Linux OLD above. 

This is updated for Ubuntu 11.04 and Xilinx ISE 13-14.


Introduction

If you found this information helpful, you can Donate a small sum of money (of your choosing) to help me get through my degree and for the upkeep of this server. You may contact me here.
This page originally gave a basic howto on installing the cable drivers for the Xilinx ISE (specifically iMPACT) under Linux/Unix. The page was well received, and I got many emails with various problems, which we overcome. This page was modified to include the ISE installation. This was prompted by me having to reinstall ISE on Ubuntu 9.10 (64-bit). This method I have tested on Ubuntu 8.04, 10.04_beta and Mint Gloria. It should certainly be valid for any Debian based system, and probably any system where it is possible to do what I have suggested.
This Install Guide was written with Ubuntu 11.04 64-bit Desktop Edition and Xilinx ISE 13.2. Last tested by me on Ubuntu 13.10, Xilinx ISE 14.7
Finally, I am no expert in any of this: FPGAs, Xilinx or Linux. I just applied what knowledge I did have, and made it work. I offer my experience as help to you.

Installing Xilinx ISE

When installing Xilinx ISE, make sure that the installer is located on the hard drive. The installer needs to have write permissions to the setup files. Burning the files to DVD has been reported to create problems.
Download Xilinx ISE from their website. This guide assumes you have Xilinx_ISE_DS_Lin_13.2_O.61xd.0.0, which is the full version. However, the webpack should work in the same manor.


Extract the archives to a place with read and write permissions, and chmod the installer file executable my all. To do this, change into the folder with the installer files are located and issue the command
sudo chmod a+x xsetup
Then you are ready to install the ISE suite. I suggest you do this as root. To start the installer, enter the following command:
sudo ./xsetup
Go though the menus, as they are fairly obvious. Here are my suggested responses:
    • Next the welcome screen.
    • Accept the License Agreement (part 1).
    • Accept the License Agreement (part 2).
    • Except the default install path of /opt/Xilinx/13.2 – Feel free to change this, but the rest of this guide assumes you have not.
: Also note, when working and referring to this path, that Xilinx begins with a capitalised X.
  • Select what you wish to be installed. I chose everything, but if you’re using a free WebPACK license, then just install that; save yourself the 15GB disk space!
  • You next have to select the last few installation options:
  • * Check Aquire/Manage a License Key.
  • * Uncheck Install cable drivers (does not work, use the method outlined below) – Saves you having to okay the dialog when it eventually fails! (see image below)
  • * Check Enable WebTalk (stops it complaining if you use WebPACK).


    • Leave the default path, /opt/Xilinx/13.2
    • Review the proposed installation stuff, and start the install
    • Wait for a small eternity.
    • The Xilinx License Configuration Manager should appear:
: Select what best describes what you need. The “Start ISE WebPack” gives you unlimited access to fundamental applications, but not to everything. for help on what does what, check out the Xilinx Software Matrix, here. At this point, I select “Get my Purchased Licenses”. This opens Firefox (or your default web browser), and asks you to log into their system. You can download your licenses file from them, and browse to it using the “Copy License” button under the “Manage Xilinx License” tab. Either way, get a license from Xilinx. Once you have done so, close the License Config Manager.
  • You should be told Installation is complete;  Press Okay.
  • Move onto the next steps of installing cable drivers.

Errors with SysGen under Ubuntu 13.10 and ISE 14.7

I found this error while trying to launch the System Generator under ISE 14.7:
$ sysgen
/opt/Xilinx/14.7/ISE_DS/ISE/sysgen/util/sysgen: 82: /opt/Xilinx/14.7/ISE_DS/ISE/sysgen/util/sysgen: Syntax error: “(” unexpected
The answer is simple. You need to edit the sysgen script, /opt/Xilinx/14.7/ISE_DS/ISE/sysgen/util/sysgen and replace the top line to use bash instead of sh
sudo nano /opt/Xilinx/14.7/ISE_DS/ISE/sysgen/util/sysgen
and replace
#!/bin/sh
with
#!/bin/bash
You should now find that System Generator works.

Using Xilinx USB JTAG Programmers under Linux (Installing Cable Drivers)

Assuming you have followed the above installation howto, this next section should follow on. If you jumped straight here to this section the next section on installing Cable Drivers should standalone. If you have problems, please check that you have similar options set in your ISE install to those I outline in the previous section.

Getting what’s needed

First of all, this guide assumes you have installed Xilinx ISE (version 11.1 is used here) into the default path of /opt/Xilinx
Next, you will need to have GIT installed to get the required libraries. This approach does not use the official Xilinx libraries but a replica of them. You will also need libusb-dev which is required in the compiling of the drivers. You will also need build-essential metapackage for the compiler. On a 64-bit host, you will need to get the 32-bit version of libc6-dev-i386.
On 32-bit
sudo apt-get install gitk git-gui libusb-dev build-essential libc6-dev fxload
On 64-bit
sudo apt-get install gitk git-gui libusb-dev build-essential libc6-dev-i386 fxload
Philipp Hörauf reports there is a need to install ia32-libs-dev on some 64-bit systems, though I didn’t require this.

Download the driver source

You should firstly change to the installation directory. You need (assuming default install path) to change directory to /opt/Xilinx. Then you will be required to use git to download the source.
cd /opt/Xilinx
sudo git clone git://git.zerfleddert.de/usb-driver

Compiling the Driver

This step is once simple command, but the most important. It compiles the cable driver required. There are two versions depending on the version (32-/64-bit) of Xilinx ISE you have. Firstly change into the source directory created in the previous step. Then you need to issue the make command.
cd usb-driver/
sudo make
Since the drivers now support 64-bit too, you don’t need to build the 32-bit version. If you have trouble, try sudo make lib32 to build the 32-bit driver.

Setting up the Cable Driver

The newer versions of the usb-driver come with a setup script, which is very useful! You can run setup_pcusb and have it do all the complicated stuff for you, thusly…

george@diode:/opt/Xilinx/usb-driver$ ./setup_pcusb /opt/Xilinx/13.2/ISE_DS/ISE/

Fixing the Path

This step may not be required if the Xilinx install appends to your .bashrc automatically:
Running the following two lines will add the Xilinx path to the system path, and will ensure that the Xilinx binaries are accessable by the system.
32-bit
echo “PATH=\$PATH:/opt/Xilinx/13.2/ISE_DS/ISE/bin/lin” >> ~/.bashrc
echo “export PATH” >> ~/.bashrc
64-bit
echo “PATH=\$PATH:/opt/Xilinx/13.2/ISE_DS/ISE/bin/lin64/” >> ~/.bashrc
echo “export PATH” >> ~/.bashrc
Some people reported that the 32-bit version didn’t work correctly on 64-bit host.
Ensure you are using the 64-bit version of the ISE software.
The 64-bit stuff is located in /opt/Xilinx/11.1/ISE/bin/lin64/

Connect the Programmer

Once you get to this point, the cable drives have been installed, and you’re now ready to connect the Xilinx USB JTAG Programmer to the PC’s USB port. If you follow the computer’s system log (kernel messages) then you should be able to see the process of flashing the firmware happening as well as the Firmware light on the programmer illuminate.
On the Spartan-3E board shown here in the video, you can see the firmware light to the left of the USB socket. The screen is split, showing you the webcam video on the left and the kernel messages on the right.

iMPACT

iMPACT seems to reliably crash for me every time I do a boundary scan.
george@diode:/opt/Xilinx$ cat /home/george/_impact.log
iMPACT Version: 13.2
iMPACT log file Started on Sat Jul 30 00:46:45 2011
Welcome to iMPACT
iMPACT Version: 13.2
// *** BATCH CMD : setMode -bs
GUI — Auto connect to cable…
// *** BATCH CMD : setCable -port auto
Xilinx ISE 12.1 will perform a boundary scan just fine. Seems to be an issue with ISE 13.2.


Issues, Problems & Troubleshooting

I had no issues with this approach; In fact, it surprised me how simple it had become. If you do have problems, there is much more depth to the old tutorial, which you can view here. It has a troubleshooting section, too!


Xilinx USB Issues

Using Ubuntu with the Xilinx tools can be problematic.  Xilinx does not even try to install cable drivers for the "impact" programmer for Linux that is not Redhat or Suse (such as Ubuntu).

To make impact work, I followed (roughly) these steps:
  1. Install the "fxload" and "libusb-1.0-0" and "libusb-1.0-0-dev" packages

    # apt-get install fxload libusb-1.0-0 libusb-1.0-0-dev
  2. The impact tool is built to look for the USB library in "/usr/lib64/libusb.so" (or /usr/lib/libusb.so on 32-bit systems), so a symbolic link needs to be made:

    # ln -s /usr/lib64/libusb-1.0.so /usr/lib64/libusb.so

    or, if using Ubuntu 12.04

    # ln -s /usr/lib/x86_64-linux-gnu/libusb-1.0.so /usr/lib/x86_64-linux-gnu/libusb.so

     
  3. The Xilinx firmware images needs to be available for udev.  From the root of the Xilinx package, copy the "*.hex" files to "/usr/share":

    # cp /opt/Xilinx/12.4/ISE_DS/ISE/bin/lin64/*.hex /usr/share
  4. The "udev" system needs to be configured for the Xilinx USB devices.  This important step loads the proper firmware, and sets the permissions on the device file that was created when the device is connected.  This requires placing a file in the /etc/udev.d directory.   After coppying the file, a change must be made to accomodate the new version of udev that Ubuntu uses.  This can be done using the "sed" command:


    # cp /opt/Xilinx/12.4/ISE_DS/ISE/bin/lin64/xusbdfwu.rules /etc/udev/rules.d

    # sed -i -e 's/TEMPNODE/tempnode/' -e 's/SYSFS/ATTRS/g' -e 's/BUS/SUBSYSTEMS/' /etc/udev/rules.d/xusbdfwu.rules
  5. Most sources that describe this process indicate that it is sufficient to restart udev.  I found that this isn't the case on my ubuntu system.  I rebooted the system at this point to enforce the new rules for udev.

    # reboot
  6. After the reboot, connecting the USB programmer to the host and the board should register the board with udev.  If everything worked at this point, you can use the "lsusb" command to detect the board.  The board must appear with the firmware version :0008.  The XUPV5 boards, without the proper firmware, appear as rev :000d. 

    # lsusb
    ...
    Bus 001 Device 006: ID 03fd:0008 Xilinx, Inc.
    ...
  7. Finally, to ensure that the Xilinx tools will use the libusb driver (instead of the windrvr version), an environment variable must be set.  The best place for this, in most cases, is the settings file.  Edit the settings file, and add the

    export XIL_IMPACT_USE_LIBUSB=1
  8. Finally, test out connectivity by loading the "impact" utility, and initializing the boundary scan

Sunday, July 21, 2019

HashCash: Cryptocurrency

HashCash

The term HashCash: Defined in Cryptocurrency in this page explains hashcash and how bitcoin uses it.
 
Hashcash POW


Bitcoin uses the hashcash Proof_of_work functions as a mining core.

All bitcoin miners whether CPU, GPU, FPGA or ASICs are creating hashcash proofs-of-work which is the blockchain evolution and validate the blockchain transaction log.

Algorithms hashcash uses hash function s as a building block, in the same way that HMAC, or RSA signatures are defined on a pluggable hash-function.

This is commonly denoted by naming an algorithm-hash: HMAC-SHA1, HMAC-MD5, HMAC-SHA256, RSA-SHA1, etc, hashcash can be instantiated with different functions, hashcash-SHA1, hashcash-SHA256^2 (bitcoin), hashcash-Scrypt(iter=1). 

History


Hashcash / proof-of-work function invented in 1997 by Adam Back, and proposed for anti-DoS attack uses preventing the anonymous remailer and mail2news gateway abuse.

The name "nym" on nymservers is a pseudonymous for remailer severs and as a general email anti-spam, and general network abuse throttling.

Before bitcoin hashcash was used by SpamAssasin, and the incompatible format by Microsoft named "email postmark" in hotmail, exchange, outlook etc and by i2p anonymity network, mixmaster anonymous remailer components and other systems.

Hashcash was also used by Hal Finney's bitcoin precursor RPOW as a way to mine coins.

Wei Dai's B-money Proposal, and Nick Szabo's similar Bit Gold proposal bitcoin precursors, also were proposed in the context of hashcash mining.

Hash functions


In 1997 algorithm hashcash that used SHA1, because at that time, this is/was their defacto and the NIST recommended hash, and the previous defacto hash MD5 had recently started to show signs of weakness, and as all do over time.

Bitcoin being specified/released in 2008/2009 uses SHA256 and improving.

There is  no strong reason SHA1 will not have worked, and hashcash relies only on the hash partial preimage resistance property which is a security up to hash-size, 160-bit with SHA1, and security up to 80-bit), so the SHA1 hash is big enough, but...

Bitcoin is built to 128-bit security related to 256-bit ECDSA being used, which also offers 128-bit security.

The SHA256 is more conservative choice and SHA1 has started to show some weaknesses.

Cryptanalytic Risk


An issue switching to hashcash-SHA3 is it will invalidate all existing ASIC mining hardware, and is a security risk.

There is no indication that SHA1 or SHA256, or SHA256^2 are vulnerable to pre-image hacker attack.

The motivation is missing absent new cryptanalytic developments.

If SHA256^2 became easier due to cryptanalytic attack, as miners start to using whatever the new algorithmic was, regardless, as difficulty would just adapt to it.

One side-effect will be to introduce more memory or computation trade-offs  could make ASICs unprofitable and currently is.

Computation advantages willo replace the hash with SHA3. Withoutl speculation as pre-image affecting cryptanalytic attacks are found on SHA256 is catalyst for change.


Hashcash function


Hashcash algorithms relatively simple to understand. 

These idea builds on security property of cryptographic hashes, designed to make difficult to invert, regards, any pre-image resistant property attack. 

Version 0 of hashcash protocol (1997) used a partial 2nd pre-image, however the later version 1 (2002) uses partial pre-images of a fairly chosen string, rather than digits of pi or something arbitrary, 0^k (ie all 0 string) is used for convenience, so the work is to find x such that H(x)=0.


Adding purpose


The service string could be a web server domain name, a recipients email address, or in bitcoin a block of the bitcoin blockchain ledger.

One additional problem is that if multiple people are mining, using the same service string, they must not start with the same x or they may end up with the same proof, and anyone looking at it will not honor a duplicated copy of the same work as it could have been copied without work, the first to present it will be rewarded, and others will find their work rejected.

This is what hashcash version 1 and bitcoin does. In fact in bitcoin the service string is the coinbase and the coinbase includes the recipients reward address, as well as the transactions to validate in the block.

Bitcoin actually does not include a random start point x, reusing the reward address as the randomization factor to avoid collisions for this random start point purpose, which saves 16-bytes of space in the coinbase. For privacy bitcoin expect the miner to use a different reward address on each successful block. 

More Precise Work

Hashcash as originally proposed has work 2^k where k is an integer, this means difficulty can only be scaled in powers of 2, this is slightly simpler as you can see and fully measure the difficulty just by counting 0s in hex/binary and was adequate for prior uses. (A lot of hashcash design choices are motivated by simplicity).


Work, difficulty & cryptographic security


Bitcoin also defines a new notion of (relative) difficulty which is the work required so that at current network hashrate a block is expected to be found every 10 minutes.
It is easier to deal with high difficulties in log2 scale (a petahash/second is a 16 decimal digit number of hashes per second), and makes them comparable to other cryptographic security statements.

The EFF "deepcrack" DES cracker project built a hardware brute force machine capable of breaking a DES key in 56 hours to make a political point that 56-bit DES was too weak in 1998 at a cost of $250,000 design time.

By comparison bitcoin network does 62-bits (including +1 for double hash) every 10-minutes.

This is 537,000 times more powerful than deepcrack, or could if it were focused on DES rather than SHA256 crack a DES key in 9 seconds to deepcracks 56 hours.


Miner privacy


In principle a miner should therefore for privacy use a different reward-address for each block.

Why Satoshi's early mined bitcoins were potentially linked, was because while he changed the reward-addresss, he forgot to reset the counter after each successful mine, (penetrations advisory), which is a bitcoin mining privacy bug, and a great loop-hole already fixed.

In fact with bitcoin the counter also should be obscured revealing your effort level, and with increased mining power that will imply who the coin belongs to.

Bitcoin does this via the nonce and extra-nonce. Nonce starts at 0, but extra nonce is random.

Together these form a randomized counter hiding the amount of effort that went into the proof, as no one can tell if it is a powerful and unlucky miner who worked hard, or a weak miner who was very lucky or hacked.

The introduction of mining pools, and the miner uses the same reward address for all users, which is what the current mining protocols does which is a risk that users may redo work.

Avoiding miners redoing work, the miners hand out defined work for the users to do.

However this creates an unnecessary communication round trip and in early protocol versions and which means the miners are not validating their own blocks, and this delegates validation authority, though not work, to the pool operator, reducing the security of the bitcoin network.

Recent mining protocol version allows miners to add their own block definition. This unnecessarily incur round trips for handing out work allocation.


Scrypt proof-of-work


A misunderstanding about the Scrypt proof-of-work is a scrypt not intended as a proof-of-work function.

Scrypt proof-of-work scrypt is a stretched key-derivation function.

Scrypt proof-of-work can not be used to make an efficiently publicly auditable proof-of-work, as verifying costs the same as creating.

Hashcash with the internal hash function of "Scrypt" may be denoted hashcash-Scrypt(1). Scrypt, by Colin Percival, is a key-derivation function for converting user chosen passphrases into keys.

It is salted (to prevent pre-computation/rainbow table attacks), and the hash is iterated many times to slow down passphrase grinding.

Scrypt is similar in purpose to the defacto standard passphrase key-derivation function PBKDF2 and which uses HMAC-SHA1 internally.

The differentiator is why people choose Scrypt rather than PBDF2 is that Scrypt's inner hash uses more memory so the GPU.

This does not use the key-stretching feature of Scrypt so mining is not actually using Scrypt directly.

The inner Scrypt hash (accessed by setting the iteration parameter to one iteration).

Scrypt's key-stretching function is not being used at all to contribute to the hardness, unlike its normal use for key protection eg in deriving the encryption key from user passphrase to encrypt bitcoin wallets.

Scrypt's key-stretching can not be used for mining this simultaneously makes more expensive to verify by the same factor.

Hashcash variant will be denoted hashcash-Scrypt(iter=1,mem=128KB) or shortened to hashcash-Scrypt(1).

Other major scrypt parameter denotes amount of memory to 128kB. Decentralization: hash-cash-Scrypt vs hashcash-SHA256

This 128kB Scrypt memory footprint is less vulnerable to centralization of mining power arising from limited access to or ownership of ASIC equipment by users resolves a profit based industry working against miners.

The hashcash-SHA256^2 is very simple. This simplicity ensures that many people will do it and ASICs should become less available that only serves mining farms and nto the common people.


In hardware the time-memory tradeoff would be optimized to find the optimal amount of memory to use, and it is quite possible the optimal amount would be less than 128kB.


This makes validating scrypt blockchains more CPU and memory intensive for all full nodes.

May The Crypto-Forces Be With You Always, and Be Careful/Safe!